Dieselsite External Transmission Filter Kit Installation
June 29, 2005
Written by: E. Long
Discuss this article in this forum thread

Introduction
This "how to" article was performed on a 2000 Ford Excursion with the 7.3L Powerstroke Diesel and 4R100 transmission. At the time of this installation, I was getting more into towing larger loads (mainly a friend's boat). Tipping the scales with the boat, trailer, gas, and gear, 7,000+ lbs was more than I had towed before. Having already gone through one transmission at 87,000 miles, with 60K on my 2nd transmision, I was looking for anything/everything possible to prolong the life of the transmission.
Goal
The goal of this install is to prolong the life of the transmission by adding an external, replaceable transmission filter kit. I also opted for the filter gauge so I know for sure when the filter needs replacing. This gauge is much better than Ford's air filter gauge on the air box in your engine compartment (mine has yet to move). Automatic transmissions have internal filters designed to capture only large particles. These filters are designed as a pickup to keep large particles from flowing through the transmission. These filters are on the suction side of the pump. Fine filtration in the pan is not an option for the transmission manufacturers due to the fact that transmission pumps should not be restricted. The only way to get fine filtration for a transmission is with an external transmission filter kit on the push side of the pump. The 4R100/E4OD and many other transmissions were never equipped with this type of external filter. The Allison in the Chevy and many medium duty and heavy duty trucks come equipped from the factory with an external transmission filter. This is not a new idea in transmission maintenance and protection.
This install procedure vs. provided instructions
The instructions provided with the Dieselsite external transmission filter kit tell you to choose where you want the filter to be mounted on the frame in the first step. I wasn't able to tell specifically where along the frame they mounted theirs (in the pictures provided with the install instructions), so I left the actual drilling/mounting to be one of the last steps -- after I routed the braided lines. I made the mistake of drilling the holes and mounting the filter too soon anyway, and found myself having to relocate it by a couple inches so the braided lines could reach the filter.
Required Tools:
(1) 7/8" wrench
(1) 16mm wrench
(1) 11mm wrench
(1) 11mm socket (1/4" ratchet)
(1) drill
(1) 1/4" drill bit
(1) safety goggles
(1) allen wrench (for optional filter gauge)
teflon tape
(3) zip ties
(1) drain pan
2-3 quarts of transmission fluid
lots of rags
Products needed:
(1) Dieselsite filter gauge (optional)
(1) Dieselsite External Transmission Filter Kit
Parts Inventory:
The parts list is as follows:
(1) filter
(2) braided lines
(1) filter mount/assembly & bracket
(2) large brass fittings (to connect to the filter assembly)
(1) 90-degree fitting
(2) straight-through fittings
Time Requirements
2-3 hours
Difficulty
3 out of 10 (1 being easiest, 10 being hardest)
Where to Buy
This kit is available exclusively from Dieselsite.com. Click here for a direct link to the product.
| Step 1: Disconnect rear transmission line | ||
|
||
| Step 2: Install 90-degree fitting on the disconnected line | ||
|
||
| Step 3: Install first stainless steel hose | ||
|
||
| Step 4: Mount the filter bracket, install gauge & line | ||
|
||
| Step 5: Install gauge | ||
|
||
| Step 6: Route lines & tighten all fittings | ||
|
||
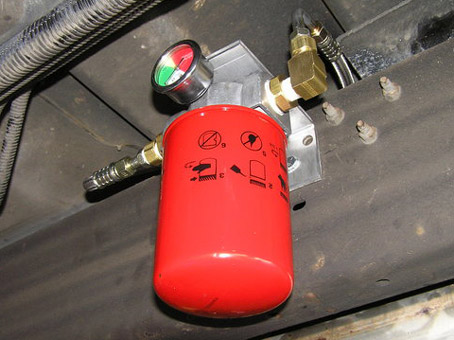
| Step 7: Secure lines, install filter, and test! | ||
|
||
| Conclusion | ||
|
For me, the filter adds peace of mind. I know when to change the filter based on the gauge, and I know this filter does a much better job than the internal transmission filter. This install is very easy and I highly recommend it for all 4R100 vehicles. I want to extend the life of this transmission (so I don't have another 87K failure) and the filter is an excellent part of the equation. |
||
| Additional Questions or Comments? | ||
|
Do you have additional questions or comments about this install article? Please discuss them in this forum thread. HINT: Click the "printable page" button below to view this article in its entirety with higher-resolution photos. |
Back to the installs page.