|
|
LOCK-IN WEDGE SERVICE PROCEDURE
NOTE: This procedure should only be performed if the lock-in wedge was never installed, or the original wedge is loose or missing.
A. Lock-In Wedge Removal (If Applicable)
1. Depress the parking brake pedal until a full travel position is achieved. The pedal will be in a vertical position.
WARNING: BE CAREFUL TO AVOID ACCIDENTALLY ACTIVATING THE RELEASE LEVER DURING ANY PART OF THE LOCK-IN WEDGE SERVICE PROCEDURE.
2. Using a pair of standard or needle nose pliers, grip the tab of the lock-in wedge. Pull the wedge out with a twisting motion.
3. Release the parking brake.
4. Inspect the wedge for damage. If any part of the wedge is broken or damaged, obtain a new wedge.
C. Parking Brake Adjustment
NOTE:
The installation of the lock-in wedge disables the self-adjusting feature of the parking brake system. Therefore, it is critical to adjust the parking brake system before installing the lock-in wedge.
1. Place the transmission in neutral, then raise the vehicle on a hoist until the rear wheels are off the ground.
NOTE: The vehicle must be supported by the rear axle to maintain curb height.
2. Position two (2) jack stands under the rear axle housing, then lower the hoist until the weight of the vehicle is supported by the rear axle.
3. Apply and release the parking brake three times allowing the pedal to return each time without any interference.
4. Firmly apply the parking brake.
5. Verify that the parking brake is applied by trying to rotate the rear wheels by hand.
6. Release the parking brake with your foot resting on the pedal, and allow the pedal to return slowly to the released position.
7. Verify that the parking brake is fully released. Check for brake drag by rotating the rear wheels by hand.
8. Raise the vehicle and remove the two (2) jack stands. Lower the vehicle.
9. Call 1-800-325-5621 for further instructions if any of the following conditions exist:
a. The rear wheels turn while the parking brake is applied.
b. Brake drag occurs when the parking brake is released.
C. Lock-In-Wedge Installation
NOTE: Do not proceed unless the parking brake system is working properly.
WARNING: BE VERY CAREFUL TO AVOID ACCIDENTALLY ACTIVATING THE RELEASE LEVER DURING ANY PART OF THE LOCK-IN WEDGE SERVICE PROCEDURE.
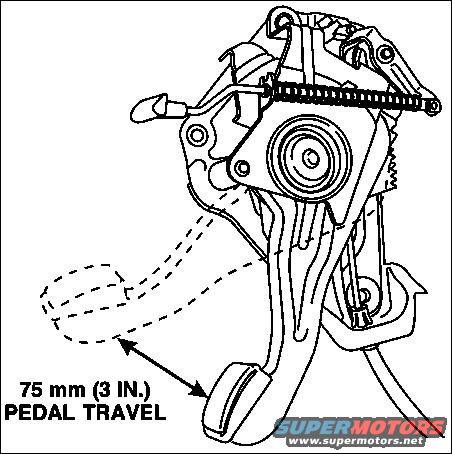
1. Depress the parking brake pedal so that the pedal travels 75 mm (3 inches) from the released position.
|